Sunday, January 29, 2012

Outsiders in London: Brownies


Outsider Tart - Wine and Cheese Festival
Of course, the moment I heard there was going to be a Chocolate Festival in London it was on my calendar. The main event for me was the baking demonstration with David from The Outsider Tart. I had tried their peanut butter cheesecake brownie at the Wine and Cheese Festival earlier in my London adventures and fell in love. I was determined when I saw they were doing a baking demonstration that I had to go.

Little did I know that this was an American bakery - until I googled it. Of all the things for me to fall in love with in London it was an American bakery. Funny, right?

The bakery was started when both Davids (David Lesniak and David Muniz) moved to London from New York. They started The Outsider Tart to bring American baked goods to the area, focusing on brownies, cupcakes, whoopie pies, and cookies. For them, it was about spreading recipes that had been passed down for generations and showing that baking can be accessible to everyone. For me, it was a taste of home.

The cooking demonstration was cold, wet, and we were all huddled in folding chairs in a large white tent. But it was worth every minute. The David who wasn't sick showed up and had the host of the festival help him create two of their favorite brownie recipes. The fun part was that he didn't take himself too seriously. Although they have their own pans made specially for them, he emphasized how anyone can bake and that you have to keep going no matter what gets thrown at you. He even forgot to add some liquor to one of the brownie batters until it was in the pan, but that didn't faze him.


He made a chocolate-cherry cheesecake brownie that was prime competition for their peanut butter cheesecake brownie. The brownie and cheesecake were mixed together in this beautiful soft meld of flavors. I think their real trick is that when swirling together the cheesecake and the brownie mix it's very simple and light. You aren't supposed to shove the knife in and swirl it dramatically - as I know I do to try and get that marbled look. Instead he emphasized a light drawing of the knife back and forth across the plan and finishing there. Don't go back again. Don't play with it. Don't try to be too creative. This way the brownie batter is still mostly at the bottom, but you get a nice moist mix of the two to give it that mix of flavors.

These brownies were so good that I was begging for more, literally. They had trays of samples for everyone and the leftovers I called out and asked for. When it comes to brownies this good, you can be greedy.

I now desperately want their new book Baked in America. It can be ordered online at their website, through Amazon, or picked up at their store. If you're in London stop by their store. I was really disappointed I didn't go, but was at least able to take advantage of seeing them at the two food festivals. Back in America, I still want their recipes. There's 120 in their new book too and I can not stop drooling over the cheesecake brownies.

Perhaps it's the taste of home for another outsider in London that drew me to them, but that doesn't decrease the deliciousness of these baked goods.
- Mollie

Sunday, January 22, 2012

Never Too Many Turtles

My sister's boyfriend has stated that he would trade her for Turtles - that's just how much he loves them. From then on there has been an overwhelming love for and joking about Turtles in my family. This is why when I got my daily My Recipe cookie recipe e-mailed to me, I sent this one straight to my sister and swore I'd make them when I got home.

Peanut Butter-Toffee Turtle Cookies.

Just take that in.
Peanut Butter. Toffee. Peanuts. Chocolate. Caramel. All of that sweet indulgence packed into a little cookie. If you aren't drooling on your keyboard yet, I'm not doing my job - or you're allergic to peanuts.

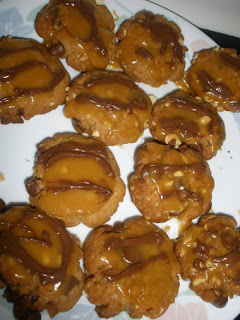
I had to hide these cookies to be able to bring some to Christmas Eve - where they were quickly and thoroughly devoured. Although a lot of intricate work with the tough peanut butter dough and spreading the chocolate, these cookies are worth every inch of frustration I put into them. So here we go...

Peanut Butter Toffee Turtle Cookies
 recipe from Southern Living
 
Ingredients
  1/2 cup unsalted butter - softened
  1/2 cup sugar
  1/2 cup light brown sugar - firmly packed
  2/3 cup creamy peanut butter
  1 large egg
  2 cups Bisquick Baking Mix (If you have it: If not use a substitute = 2 cups of flour, 3 teaspoons baking powder, 1/2 teaspoon salt, 2 tablespoons Crisco. Mix everything except the Crisco and then cut Crisco into the mix. This makes the full 2 cup substitute and I think it's even better than Bisquick)
  2/3 cup toffee bits
  2/3 cup coarsely chopped peanuts
  2/3 cup milk chocolate chips
  10 ounces of vanilla caramels (approx.)
  2 - 3 tablespoons whipping cream
  1/2 teaspoon vanilla
  2/3 cup milk chocolate chips, melted (save the melting till after the cookies are baking/cooling)

Instructions

1. Preheat oven to 350 degrees.

2. Beat together softened butter, sugar, light brown sugar, and peanut butter on medium speed until nice and creamy. Add the egg and beat until blended.

3. Add Bisquick or Bisquick substitute at slow speed until just mixed together.

4. Stir in toffee bits, chopped peanuts, and 2/3 cup of chocolate chips.

5. Drop by spoonfuls onto your baking sheet and flatten it with your hand. I used my hands to round them out as well, but be careful they'll fall apart easily and the dough is a bit crumblier than say sugar cookie dough. The peanut butter and all the bits make it a bit difficult, but be patient.

6. Bake cookies at 350 degrees for about 10 to 12 minutes. Watch these carefully and know your oven, they want to be just golden and not with burnt bottoms. Cool and put on plates, a wire rack, something away from the oven to finish off the cooling.

7. Microwave caramels and the 2 tablespoons whipping cream in a bowl at high heat for 1 minute. Stir. Microwave in 30 second intervals, stirring after, until the caramels melt completely and it's nice and smooth. If it's still thick add more whipping cream and continue with the 30 second intervals.

8. Stir the vanilla into the caramel mixture. Then spoon the mixture evenly on top of cookies. Be careful, because you don't want too much to run all over the kitchen, but you want to be able to spread it evenly across.

9. Drizzle across the top with melted chocolate.
   Although this sounds like the easiest step, trust me, it was the worst. My chocolate wanted to cool and harden much faster than I could get it on the cookies. It also didn't want to drip nicely off the spoon, knife, chopstick, every utensil I tried to use to get the nice drizzle affect. I think using milk chocolate makes this very different - I think mine were semi-sweet and that has a different consistency. So be prepared and maybe even use chocolate made for drizzling if you want them to look really nice. You can see mine are a bit lumpy.

These cookies were rich, full of flavors, and a surprising delight for our Christmas celebrations. I think I might make them for Valentines day as well, they're that good and show the love you put in.

So if you've been offered in exchange for turtles, show them you're worth more and make your own turtle cookies - I'm sure it'll raise your value double if not tenfold. Enjoy!

- Mollie

Monday, January 16, 2012

Rudolph the Red-Nosed Cookie

Christmas is all about giving and thinking about others, so why can't we incorporate a whole lot of cute into the giving?

At least, that was my thought when my mom asked me to bake her some cookies to take to work. My sister joined in the request. So now I had two workplaces expecting Christmas cookies. I had to do something different, something people will enjoy, something fun, something that will stand out.

That was when I was e-mailed via myrecipes.com newsletter a Rudolph Christmas Sugar cookie recipe. The reindeer shaped cookies were cute and fun. Chocolate chips, pretzels, sugar cookies, who wouldn't love all these things? It was given the mother stamp of approval and I started to plan.

The original recipe calls for just using plain, refrigerated sugar cookie dough. I'm not really a refrigerated sugar cookie dough girl, unless that dough is made by my own hands. So I dug into my Allrecipes.com stockpile to pull out The Best Rolled Sugar Cookies recipe.

No really. That's what the recipe is called. That made me giggle the first time I saw it, but it isn't false advertising. Although you want to be sure to refrigerate it for quite a while (I did mine overnight) these sugar cookies are fantastic and easier to maneuver than most.

The Best Rolled Sugar Cookies

Ingredients
1 1/2 cups butter, softened (feel free to do half butter, half margarine, that's what I usually do)
 2 cups white granulated sugar
 4 eggs
 1 teaspoon vanilla extract
 5 cups all-purpose flour
 2 teaspoons baking powder
 1 teaspoon salt

Directions
 1. In a large bowl, cream together the butter and sugar until smooth and creamy.

 2. Beat in eggs and vanilla. Slowly stir in the flour, baking powder, and salt. I recommend doing the flour cup by cup, since it's a lot.

 3. Cover and chill the dough in the refrigerator for at least an hour. (Recommended: Overnight.)


Now here my directions incorporate both the design of the reindeer cookies and the temperature and time of the sugar cookies. Feel free to use the sugar cookie recipe for just shapes or whatever else you'd like to do with it - it's extremely versatile. But for the reindeer you'll need pretzels (either alphabet shaped, twists, or something you can break into antler shapes), mini or regular sized chocolate chips, and red cinnamon candies or red m&ms.

4. Preheat the oven to 400 degrees Fahrenheit.

5. Flour the surface and flour your hands. If you like it extra sugary feel free to use a little powdered sugar in your hands while you knead the dough. Roll out the dough to about 1/4 inch thickness - estimate it, just so it's not super thick.

6. Cut out the dough using a 3-inch round cookie cutter. Places circles two inches apart on a baking sheet (using either parchment paper or a quick spray on the sheet).

7. Now here's the hard part. Pinch about 2/3rds down the circle with your fingers to shape the face. It should be kind of hour-glassy. Look at photos to get an idea for the shape, then have fun - they don't have to be anatomically correct.

8. Break your pretzels into antler shapes. This is frustrating. I used a knife, but wished I had bought the alphabet kinds to make those work. Whatever you find that will work best, go with it.

9. Bake on higher rack for 6 to 8 minutes or until the sides are just lightly browned.

10. Remove from oven and let cool for 1 minute. Place on a rack or somewhere to cool. Here you have to carefully place the chocolate chips on. Make sure you get it right the first time and don't touch them. They will be a bit melty, but you need to put them on before the cookie completely cools so it can harden onto the face. Place a cinnamon candy or M&M at the bottom for the nose. Now cool them completely and enjoy.

Packaging up these cookies might be a little hard, but the people at work will devour them and talk about how cute they are. So really, all the fuss is totally worth it. My favorite part was biting into an eye and an antler at the same time with the sweet, the chocolate, and the salty pretzel all at once. Yum. Don't feel too bad either, you know it isn't the real Rudolph.

- Mollie

Saturday, January 14, 2012

Classic Christmas: Spritz Cookies

Although Christmas is over the first snow just hit Chicago and I don't know about you, but the white fluffy stuff makes me want to drink hot cocoa and bake Christmas cookies.

It was really strange not having a white Christmas, or even that cold of a Christmas, this year. I distracted myself with mountains of cookies, including my favorite and our classic Christmas cookie: The Spritz cookie.
These are the best to bring to parties, share with friends, and just snack on while working on wrapping presents, trimming the tree, and watching Christmas movies. I got the recipe when my mom bought me a cookie press at a Pampered Chef cookware party. I am in love with this cookie press and most people I know are jealous of mine. I'd recommend getting one, especially if you're always baking a ton of Christmas cookies and it takes too long. These are much faster than sugar cookies, just as sweet, and fun to decorate.

This year I used my sister's press (because who knows where mine went in the move) and we had Christmas ornaments, trees, wreaths, and stars to make with lots of colorful sprinkles. So here we go.


The Pampered Chef’s
Classic Spritz Cookies

Ingredients:
1 1/2 cups (3 sticks) butter or margarine, softened 
1 cup sugar 
 1 egg
1 teaspoon vanilla
3 1/2 cups all-purpose flour
Fun colored sugar or sprinkles to decorate!

 Directions:
 1. Preheat the oven to 375 degrees Fahrenheit. 

 2. In a large bowl, beat butter on medium speed until it's creamy.

 3. Add sugar, egg, and vanilla. Beat well until all are incorporated.

 4. Add flour 1 cup at a time, mixing well after each cup. Dough will be soft, don't worry, you want it this way. It will go into the cookie press easier.

 5. Push into cookie press or make dough into balls or other shapes. 
         For the cookie press you want to make sure once it's put together that the plunger part that presses the dough is forward so the dough is at the end and against the shape. Place the shaped side of the press on the cookie sheet and do roughly 2 clicks - depending on how hard/long you click the trigger.

6. Once you've filled a sheet, decorate with sugar or sprinkles. Have fun!

 7. Bake 10 to 12 minutes or until firm. I like to see the edges just barely browning - make sure they're on the top rack to avoid burnt bottoms.

 8. Cool on cookie rack or plate.

It should make 6-7 dozen cookies. Some presses are smaller, like my sister's, so you'll get mountains of them. The best part too? 2 cookies are 120 calories. Merry Christmas!

Okay, so they don't have to be Christmas cookies either, that's just become the staple in my house. If you have the press it also usually contains other fun, seasonal shapes. So whether it's Christmas joy, another celebration, or just enjoying life, these cookies are perfect for the occasion.

- Mollie

Thursday, January 12, 2012

A New Year: A New Chicago

My time back in the states has consisted of me gorging myself on American delicacies, baking like a fiend, traveling across Illinois and being thrown back into classes without a moment to breathe.

Of course, I'll give you all the tasty details starting this weekend as I begin a New Year with new cooking adventures and new tastes.

A quick rundown of my time in America includes:

  1. A journey back from the airport with Five Guys Burgers and Fries
  2. Baking with my brand new Cake Pop Maker
  3. Piles and piles of Christmas Cookies
  4. New turtle cookies
  5. Brownies that turned into Blondies by accident
  6. Star Wars cookie cutters!
  7. Re-adjusting to Mexican Food (ouch)
  8. Lots of Movie Popcorn - including Mission Impossible and The Muppets
  9. Ice Cream Sundaes
  10. Caramel Hot Chocolate
  11. Noodles and Company: aka things my boyfriend desperately misses in Georgia
  12. Making homemade pizza with boyfriend's family
  13. Ribs.
  14. Fudge.
  15. Bears and Packers game on Christmas. (oh the agony!)
  16. Giordano's Stuffed Pizza
  17. Lou Malnati's Deep Dish Pizza
  18. Making french crepes for my family (with Nutella and banana, of course)
  19. Chocolate Cake topped with strawberries a la mode
  20. Falling in love with Chicago all over again.

Happy New Year. I hope this one is the sweetest.

- Mollie